
Daniel Osborne, Features Reporter.
You’ve just noticed it in the car park: a hairline lift at the corner of your thumbnail, four days after a manicure that cost you an hour and a fair few dollars. You press it back down. It lifts again by the time you’re unpacking groceries. If you’ve ever typed “why does my gel nail polish chip so fast” into a search bar at 11pm, you’re not alone, and you’re not doing it wrong in the way you probably think. Most premature chipping has nothing to do with the polish brand and almost everything to do with what happens to the nail plate before the colour ever goes on. A properly prepped, thinly applied gel manicure can hold a genuine shine for two to three weeks, according to wear-testing published by consumer researchers. A rushed one can fail in five days regardless of price. This guide walks through the steps that actually matter, in the order they matter, so the next set you do at home (or ask for at the salon) has a fighting chance.
- Prep matters more than product: nine in ten early chips trace back to oil, moisture or shine left on the nail plate before application, not to the polish itself.
- Thin wins: two or three thin coats cure harder and resist lifting far longer than one thick coat, because gel cures from the outside in.
- The free edge is the weak point: capping the tip of the nail with every layer is the single step most home manicures skip, and the one most responsible for early lifting at the edges.
Why Gel Manicures Fail Before Day Ten
Gel polish doesn’t dry the way regular lacquer does. It cures, meaning a UV or LED lamp triggers a chemical reaction that hardens the resin into a flexible plastic film bonded to the nail. Think of it less like paint and more like the two-part epoxy you’d use to fix a mug handle: it only grips properly if the surface is clean and dry first.
A 2021 study in the Journal of Cosmetic Science tracked wear time across manicures with varying levels of surface preparation and found that residual oil on the nail plate was the single strongest predictor of early lifting, ahead of polish brand or lamp type. The lesson is blunt: no amount of expensive top coat rescues a nail that was oily, damp or still shiny with natural keratin when the base coat went on.
This is also why the same polish can last three weeks on one hand and five days on the other for the same person. Dominant-hand nails are washed, gripped and knocked against things more often, and oil transfers back onto them faster from everyday tasks. Wear differences between hands are normal and not a sign of faulty product.
Reading Your Own Nail Plate Before You Start
Not every nail behaves the same way, and a quick self-test tells you what you’re working with before you open a bottle.
Look at your nail in side light. Ridges running vertically are common and mostly cosmetic, buffed out gently rather than filled in with thick polish. A nail that bends easily under light pressure is more flexible and may need a slightly more forgiving, thinner gel application, since flexible nails put more strain on a rigid gel film at the edges.
Next, run a thumb across the surface after washing your hands and letting them air dry fully. If it still feels faintly slick, that’s natural oil resurfacing, which happens continuously and is the reason the dehydrating step below isn’t optional.
Finally, check the skin around the cuticle. If it’s dry, cracked or sore, that’s worth addressing on its own before a manicure, since a compromised cuticle seal is an easy entry point for lifting and, separately, for infection risk. The Australasian College of Dermatologists’ public guidance on nail care notes that healthy cuticles act as a natural barrier and shouldn’t be cut back aggressively.
Prepping The Surface The Way A Painter Preps A Wall
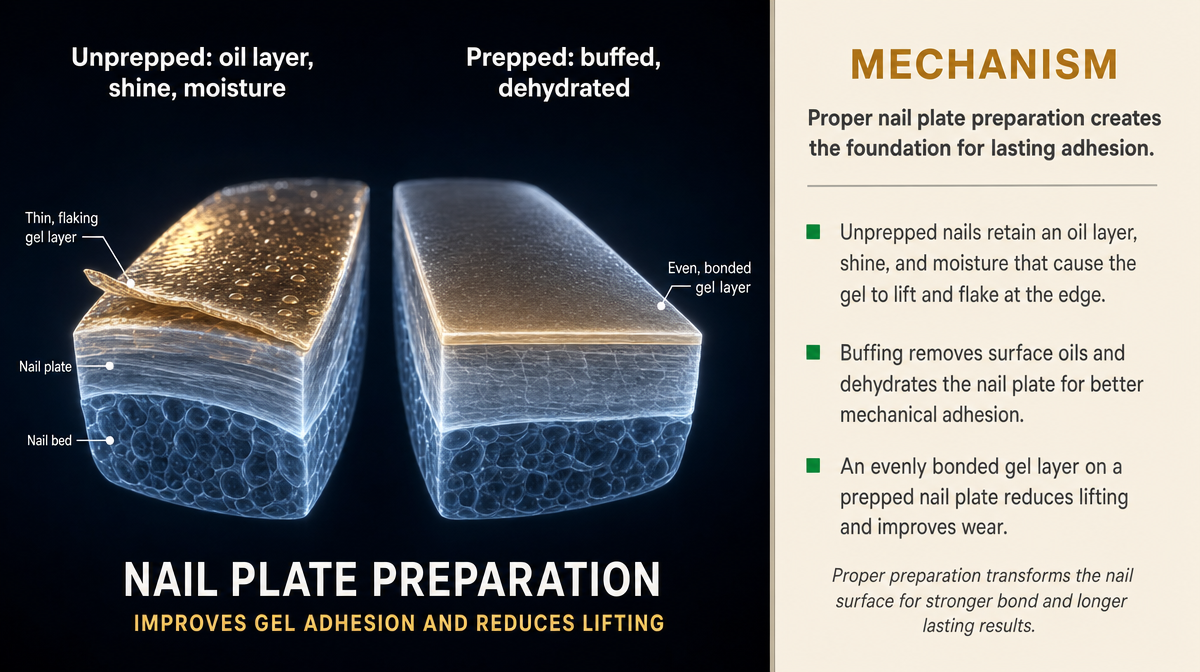
A painter doesn’t roll gloss straight onto a dusty, greasy wall and expect it to hold. Nail prep follows the same logic, in the same order.
Push back cuticles gently after softening them, rather than cutting into the living skin. Lightly buff the shine off the entire nail plate with a fine buffer, not to thin the nail but to remove the smooth top layer that gel struggles to grip. Wipe the whole nail with an isopropyl alcohol pad, not water, since alcohol lifts oil and evaporates fully rather than leaving moisture behind.
The mistake most people make here is rushing the alcohol wipe or skipping it because the nail already “looks” clean. Oil is often invisible. It’s also the step most likely to be skipped at busy salons and in five-minute home routines, which is one reason wear times vary so much between appointments.
One more detail: don’t apply hand cream in the hour before a manicure. It feels like a nice ritual but it’s the opposite of helpful, coating exactly the surface you’re about to try to dehydrate.
Thin Coats Beat Thick Ones Every Time
Gel cures from the surface down. A thick, glossy-looking coat can feel cured on top while the base layer, closest to the nail, is still slightly soft. That under-cured layer is soft, weak and the first thing to crack or lift under normal daily pressure.
Two or three thin coats, each fully cured before the next goes on, build a stronger, more even film than one thick coat ever will. It’s counterintuitive, since a thin coat looks patchy going on, but it self-levels and builds opacity across layers.
The common mistake is overloading the brush to “save time” and get full colour in one pass. It looks fine coming out of the lamp. It looks patchy and cracked by day six.
A simple check: if you can see brush drag lines once the coat is on, it’s too thick. Wipe the brush against the bottle neck until roughly two-thirds of the product is gone before touching the nail.
Curing Under The Right Light For The Right Time
UV and LED lamps work on the same principle, triggering the same resin chemistry, but at different wavelengths and speeds. LED lamps generally cure faster because they’re tuned more precisely to the resin’s reactive range.
Using an LED-formulated gel under a plain UV lamp, or timing a cure by feel rather than the manufacturer’s stated seconds, is a common cause of the soft, gummy layer under an otherwise glossy top coat. If a nail dents slightly under light pressure straight out of the lamp, it hasn’t finished curing.
Cancer Council’s public guidance on UV exposure notes that nail lamps emit UV in short, low bursts and that applying a broad-spectrum sunscreen to the backs of the hands before frequent lamp use is a reasonable precaution, much as it would be for any regular UV exposure. It’s a small step, easy to build into the routine, and worth doing if you’re getting gel done often.
Capping The Free Edge: The Step Everyone Skips
The free edge is the white tip of the nail, the part that gets knocked against car doors, keyboards and zippers dozens of times a day. It’s also the part most home manicures leave bare of polish, because it feels like an extra fiddly step.
Capping means dragging the brush lightly over the very tip of the nail with each coat, sealing the edge so the gel wraps slightly underneath rather than stopping abruptly at the top surface. Skip it and you leave a raw seam exactly where daily knocks concentrate the most force.
Done properly, capping should take about two extra seconds per nail, per coat. It’s the difference beautyheaven’s reader reviews most often point to when comparing a manicure that lasted the full fortnight against one that started lifting at the tips within days.
What Actually Causes Lifting At The Sides
Side lifting, as opposed to tip chipping, usually comes down to one of three things: polish flooding the cuticle line and sitting on skin rather than nail, moisture trapped under the gel from a rushed dehydration step, or repeated contact with water and dish soap in the first hours after application.
Gel needs roughly the time stated by the lamp cycle to fully harden, but the film keeps stabilising for several hours afterward. Hot water, degreasing dish soap and hair products with silicones and oils all interfere with that window.
The fix isn’t complicated: leave a small margin around the cuticle when applying colour, and treat the first few hours as a genuine settling period, gloves on for washing up.
Removing Gel Without Stripping The Nail
Picking off gel polish is the single most damaging habit in this entire routine, and also the most tempting once a corner starts to lift. Peeling takes layers of the natural nail plate off with it, since gel bonds more strongly to the nail than the nail’s own layers bond to each other.
The soak-off method protects the nail underneath. File off the top shine, wrap each nail in an acetone-soaked cotton pad, cover with foil, and leave for ten to fifteen minutes before gently sliding the softened gel off, never scraping or forcing it.
CHOICE’s consumer testing on nail and polish removal products has previously highlighted acetone-based removers as the most reliable for fully dissolving gel, compared with acetone-free formulas that work more slowly on cured resin. Whichever remover you use, the nail underneath should look slightly matte and even once it’s off, not gouged or ridged. Ridging or thinning is the tell-tale sign of picking rather than proper soaking.
How Long To Rest Between Sets
Nails don’t need to “breathe” in the way that phrase suggests, since nail plates aren’t living tissue drawing in oxygen from the air. What they do need is a break from the mechanical stress of repeated filing, buffing and soaking in acetone.
A short rest of a week or two between sets, with cuticle oil massaged in daily, gives the nail plate time to recover its natural flexibility and thickness. Going straight from soak-off into a fresh application every fortnight for months on end is the pattern most likely to leave nails thin, brittle and peeling at the layers.
If nails start looking noticeably thinner, discoloured or are lifting from the nail bed itself rather than just the polish lifting from the nail, that’s worth a conversation with a GP or dermatologist rather than another manicure. General public guidance from dermatology bodies is consistent on this point: persistent nail changes are a medical question, not a cosmetic one.
Key Takeaways
A gel manicure’s staying power is decided long before the colour goes on. Clean, dehydrated, properly buffed nails hold polish far longer than expensive formulas applied to unprepped ones. Thin coats, full cures and a capped free edge are the three habits that separate a set that lasts a fortnight from one that chips within a week. Removal technique matters as much as application, since picking undoes months of careful growth in seconds. And nails, like most things people ask a lot of, do better with the occasional planned rest.
A Quick Pre-manicure Checklist
- Nails clean, dry and free of hand cream for at least an hour
- Cuticles softened and gently pushed back, not cut
- Surface lightly buffed to remove shine
- Full wipe with isopropyl alcohol immediately before the base coat
- Each coat applied thin, capped at the free edge, fully cured before the next
- Cuticle oil applied daily once the set is on, and again during any rest period
- Gloves on for washing up in the first few hours after application
- Removal by soaking, never picking or peeling
This article is general information only and doesn’t replace personalised advice from a dermatologist or qualified nail technician.
Individual nail condition and wear results vary, and what works well for one person’s nails may not suit another’s.